Consul
- chenqwwq 2020/03
[TOC]
以Consul作为配置中心
以 Consul 作为微服务的配置中心,实现统一的配置管理,以及配置的动态更新。
配置获取过程
配置的获取起点在 PropertySourceBootstrapConfiguration,该类继承于 ApplicationContextInitializer,在应用上下文准备阶段(prepareContext)调用。
以下是 PropertySourceBootstrapConfiguration 的源码部分:
@Override
public void initialize(ConfigurableApplicationContext applicationContext) {
    List<PropertySource<?>> composite = new ArrayList<>();
    // 对所有的 PropertySourceLocator 进行排序
    AnnotationAwareOrderComparator.sort(this.propertySourceLocators);
    boolean empty = true;
    ConfigurableEnvironment environment = applicationContext.getEnvironment();
    // propertySourceLocators 是在声明时指定的
    for (PropertySourceLocator locator : this.propertySourceLocators) {
        // 获取配置
        Collection<PropertySource<?>> source = locator.locateCollection(environment);
        if (source == null || source.size() == 0) {
            continue;
        }
        List<PropertySource<?>> sourceList = new ArrayList<>();
        // 分别包装
        for (PropertySource<?> p : source) {
            if (p instanceof EnumerablePropertySource) {
                EnumerablePropertySource<?> enumerable = (EnumerablePropertySource<?>) p;
                sourceList.add(new BootstrapPropertySource<>(enumerable));
            }
            else {
                sourceList.add(new SimpleBootstrapPropertySource(p));
            }
        }
        logger.info("Located property source: " + sourceList);
        composite.addAll(sourceList);
        empty = false;
    }
    if (!empty) {
        // 获取原始属性
        MutablePropertySources propertySources = environment.getPropertySources();
        String logConfig = environment.resolvePlaceholders("${logging.config:}");
        LogFile logFile = LogFile.get(environment);
        // 过滤了以 bootstrap 开头的属性
        for (PropertySource<?> p : environment.getPropertySources()) {
            if (p.getName().startsWith(BOOTSTRAP_PROPERTY_SOURCE_NAME)) {
                propertySources.remove(p.getName());
            }
        }
        //
        insertPropertySources(propertySources, composite);
        reinitializeLoggingSystem(environment, logConfig, logFile);
        setLogLevels(applicationContext, environment);
        handleIncludedProfiles(environment);
    }
}
PropertySourceBootstrapConfiguration 是通用的配置获取类,每种配置中心只需要实现 PropertySourceLocators 就好。
按照上述逻辑,一个应用采用多个配置中心也是可以的,使用不同的PropertySourceLocator
PropertySourceLocator 用于定位具体的资源位置,获取资源并解析为 PropertySource,每个配置中心都可以继承该类,来获取自己的资源类型。
ConsulPropertySourceLocator 继承了 PropertySourceLocator,用来定位 consul 中的配置信息,使用的目录如下:
- ${spring.cloud.config.consul.prefix}/application
- ${spring.cloud.config.consul.prefix}/${spring.application.name}
以上两种再加上分别遍历 profiles 的结果类似:
${spring.cloud.config.consul.prefix}/application,dev/。
ConsulPropertySourceLocator最后会被包装成一个BootstrapPropertySource。
通用名称为
bootsrtapProperties-{data-dir},eg:bootstrapProperties-config/applicationconsul的配置地址默认会有一个
${prefix}/application/${data-key}Enviroment继承了PropertyResolver,所以可以使用类似
environment.resolvePlaceholders("${logging.config:}")的方式直接获得占位符的实际值。Consul 相关的配置保存在 SpringBoot 的容器中,而非 SpringCloud。
在SpringBoot启动的最后阶段,
finishRefresh中,会初始化LifecycleProcessor,并调用其中的onRefresh方法。
配置动态更新
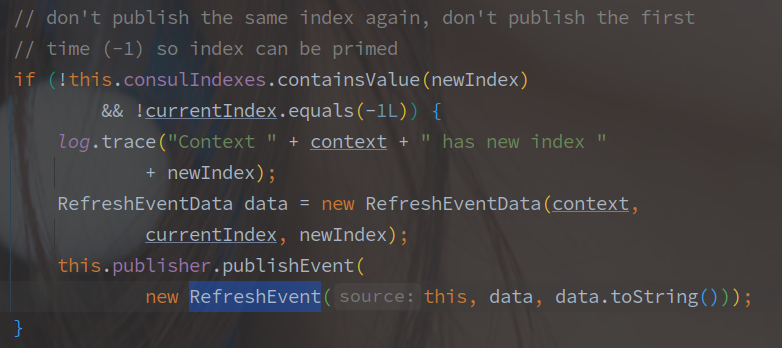
应用会启动一个定时器(ConfigWatch)定时查询 Consul 的版本号属性(index)。
在发现 index 不一致的时候就会发布一个 RefreshEvent。
RefreshEvent 是整个配置刷新流程的开端。

发出的 RefreshEvent 包含此时此时的应用上下文,并由 RefreshEventListener 接收:

接收方法中,直接调用了 ContextRefresher#refresh() 方法,在这之前判断的 ready 变量是在 ApplicationReadyEvent 的事件处理中置为 true 的。

先是刷新 Environment。
// ContextRefresher#refreshEnvironment
public synchronized Set<String> refreshEnvironment() {
   // 提炼标准的 PropertySources
   Map<String, Object> before = extract(
         this.context.getEnvironment().getPropertySources());
   addConfigFilesToEnvironment();
   Set<String> keys = changes(before,
         extract(this.context.getEnvironment().getPropertySources())).keySet();
   this.context.publishEvent(new EnvironmentChangeEvent(this.context, keys));
   return keys;
}
提炼标准的 PropertySources,需要提炼的就是 standardSources 中的属性名称,细致的 propertySource 分为 CompositePropertySource 和 EnumerablePropertySource。
可见 CompositePropertySource 和 EnumerablePropertySource 应该是 Enviroment 中的基类。
以Consul作为注册中心
Consul 可以作为 SpringCloud 的服务注册中心。
Consul 的服务注册流程
Consul 的服务注册由 WebServerInitializedEvent 触发,以 ConsulAutoServiceRegistrationListener 监听 WebServerInitializedEvent 事件。
该事件在 WebServerStartStopLifecycle#start() 中发布,表示 Web 服务初始化成功。
对于一些在 Web 服务启动后的操作也可以监听该事件,比如启动完成的状态上报等。
ConsulAutoServiceRegistrationListener 在监听到该事件之后会逐步调用到 AbstractAutoServiceRegistration#start()。
AbstractAutoServiceRegistration#start() 中基本包含了完整的注册逻辑,以下是 start() 方法中的部分源码:

在服务注册的前后发布了 InstancePreRegisteredEvent 和 InstanceRegisteredEvent。
后续就是 register() 方法中,调用了 ServiceRegistry#register 方法:

ServiceRegistry 是 SpringCloud 中服务注册的顶级接口,接口中有 register/disRegistry 方法提供注册和取消注册的逻辑。
在 Consul 中对应的就是 ConsulServiceRegistry,以下是 ConsulServiceRegistry#register 的源码:
    @Override
    public void register(ConsulRegistration reg) {
        log.info("Registering service with consul: " + reg.getService());
        try {
                    // 获取 ConsulClient,并调用其实现的注册方法,指定服务名
            this.client.agentServiceRegister(reg.getService(),
                    this.properties.getAclToken());
            NewService service = reg.getService();
            if (this.heartbeatProperties.isEnabled() && this.ttlScheduler != null
                    && service.getCheck() != null
                    && service.getCheck().getTtl() != null) {
                            // 这里注册一个定时任务,用来实现服务的定时心跳
                this.ttlScheduler.add(reg.getInstanceId());
            }
        }
        // 忽略异常
    }
注册到 Consul 之后,还需要注册定时任务已完成心跳机制。
/**
 * Add a service to the checks loop.
 * @param instanceId instance id
 */
public void add(String instanceId) {
    // 以配置中的心跳间隔等启动给一个 ConsulHeartbeatTask 的定时任务
   ScheduledFuture task = this.scheduler.scheduleAtFixedRate(
         new ConsulHeartbeatTask(instanceId), this.configuration
               .computeHeartbeatInterval().toStandardDuration().getMillis());
   ScheduledFuture previousTask = this.serviceHeartbeats.put(instanceId, task);
   if (previousTask != null) {
      previousTask.cancel(true);
   }
以下是心跳任务:

依旧是调用 ConsulClient 的客户端事件,检查服务是否正常。
Consul 的优缺点
Consul 的优点来说,Consul 的 Java 客户端原生支持服务注册逻辑,还提供了服务检查的相关逻辑,实现起来相对简单。
但是 Consul 并没有提供长连接服务,所有的服务更新只能依靠客户端的轮询来处理,就有服务更新延时的问题。
以 Ribbon 来说,更新了 ServiceList 之后,会定时 10s~30s 才会更新服务列表,如果其间有服务下线,最多需要几十秒的事件,才能将节点剔除。
个人来看,此时可以使用 Ribbon 的 Aviliable 相关的负载均衡策略,将服务的质量作为选择的标准,减少延迟带来的影响。
Consul 服务注册小结
Consul 的服务注册非常简单,就是在 ConsulAutoServiceRegistrationListener 中监听 WebServerInitializedEvent,
收集相关服务信息(NewService),向 Consul 注册,并且维护心跳就好了。
注册前后会分别发布 InstancePreRegisteredEvent 和 InstanceRegisteredEvent。